
How To Make Easy Barrel Knotted Earrings Using Cotton Cord
Watch our video tutorial or follow our easy step by step written instructions to learn how to create an easy, trendy, and eye-catching pair of knotted earrings featuring a Swarovski Crystal bezeled in a hammered TierraCast frame. This is a fast beginner-friendly project that requires little-to-no tools or special equipment!

What you'll need:

No product

Or just grab a kit!
Materials List:
-
18" 2mm Waxed Cotton Cord
-
4 Oval Jump Rings 20 Gauge 4x3mm Inside Diameter
-
1 pair French Earwire EW5008
-
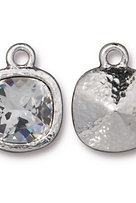
2 Hammered Cushion Drop with Swarovski 4470 10mm Charms
No product
Directions:
Step 1: Open one of the oval jump rings and attach it into the Hammered Cushion Drop. Close the jump ring completely.
Step 2: Find the center of the cotton cord and fold it in half. Cut the cord in half using scissors.
Step 3: String approximately 1" of the cotton cord through the jump ring on the drop charm from left to right. Bend the right side of the cord up.
Step 4: Bend the left side of the cord up and into a loop approximately 1" tall. Continue bending the left side of the cord down to form the 1" section into a "figure 8" shape. The charm should hang from the bottom loop of the "figure 8". The top loop will become the loop that attaches to the jump ring and earwire.
Step 5: Loop the long end of the cord (the left cord) down around the bottom of the charm and back up alongside the "figure 8" to form a frame for the charm.
Step 6: Spiral the long end of the cord around the middle of the "figure 8" 2-3 times from the top towards the bottom. Your loops should also be wrapping around the original tail end and the cord you've just brought up from the frame. Make sure to keep your loops small but leave just enough room to pass the cord underneath them, This will form the visible parts of the barrel knot. In most cases, barrel knots will display 1 fewer band than the number of times the cord has been spiraled around the base. If you spiral 4 times, 3 bands will show.
Step 7: Work the cord's tail end up through the loops so that it is laying alongside the figure 8 and the original tail end. If you're having trouble working the tail end up through the loops, use tweezers or pair of pliers to help! DO NOT TRIM THE TAIL ENDS YET!
Step 8: Using chain nose pliers, carefully twist the bottom loop of the earwire so that it is facing forward.
Step 9: Use another oval jump ring to attach the top cord loop into the loop of the earwire.
Repeat Steps 1-9 to create another earring.
Step 10: Adjust the tension of both earrings to make sure that the knots, loops, and lengths are identical.
Step 11: Trim the tail ends and apply glue sparingly.